Tips
Semester Start
Beginning of the semester setting up a course in Canvas can be stressful. Here are some Canvas setup suggestions that can help make your Canvas setup a little smoother.
- Login to Canvas using your NetID
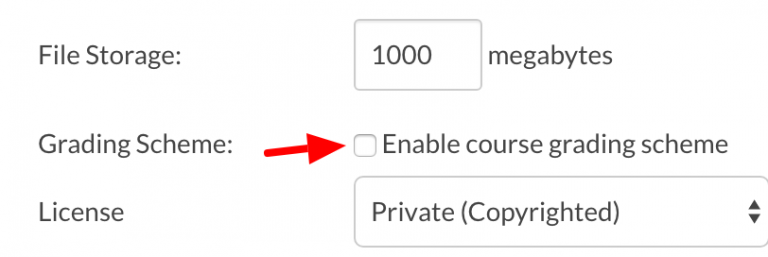
- Select “Settings” from the course navigation
- Choose “Course Details” tab
- Choose the checkbox “Enable course grading scheme”
- Choose “set grading scheme”
- You will either need to create a grading scheme or choose one that already exists
- Unless you publish your course AND your modules you will not be able to;
- Message your students from Canvas (inbox)
- You students will not be able to access the course
- To publish your course;
- Login to canvas.uwosh.edu using your NetID
- Select the course on your Dashboard you want to publish
- Select the “Publish” button in the right side bar
Semester End
Canvas uses a process called “Grade Passback” to send grades from Canvas to Titan Web. Before using Grade Passback you must;
- add a grading scheme to each of your courses (if you havent already)
- remove the test student from your roster
This sends the grades to Titan Web from Canvas, you must still login to Titan Web to finalize grade submission. If you have any problems submitting grades from Canvas please let me know.
If you would prefer to add your grades manually in Titan Web directions are below. If you have questions or problems with Titan Web please use the contact information from the website below. Canvas 24/7 support cannot help with Titan Web questions.
- Registrar’s Office
Course Settings
This is different than changing the “nickname” from the dashboard. The name will show on your student course card. Setting the nickname on the course card overrides the name for both the student and instructor.
- Go into course Settings
- Change the “Name”
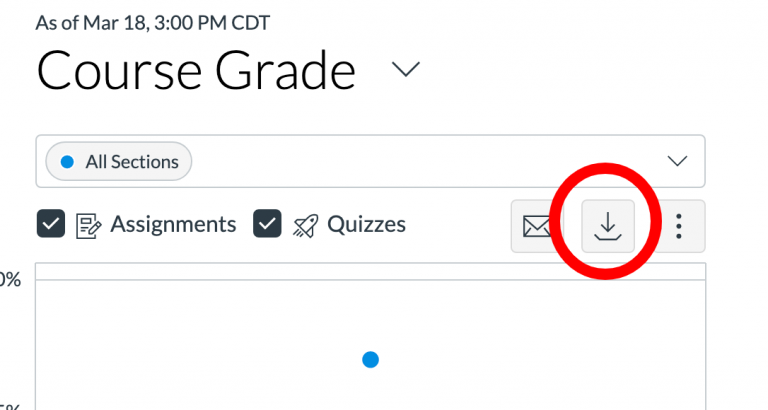
If you want to get a list of student email addresses you can use the “New Analytics” tool. On your course home page choose “New Analytics”. Choose the “Download CSV” button. Extract the zip file and you will have a Student.csv file.
Have students who go by a different name you want to keep track of? Try using the “note” column in the Canvas grade book. You have to make the notes column visible before you can use it.
- Go to your gradebook
- Select “View > Notes “
You can place notes about the student in this column. You can also move the “Notes” column in front of the “Student Name” column by dragging the notes header to the front.
Video
When capturing video using Kaltura Capture make sure you have plenty of RAM and HD space. We have been having problems with using Kaltura Capture on computers without enough system resources to properly function. The result was a video that started out fine but over time the audio became out of sync and would occasionally drop the video. So when your capturing your video make sure;
- You only have the browser windows open you need ( including tabs )
- Closeout of any other programs you don’t need to show in your video
- Empty your trash and make sure you have plenty of hard drive space to temporarily store the video.
- Kaltura Capture requires a minimum of 4GB Ram and 1GB of available storage. Full Kaltura Capture requirements list here.
If you are using Kaltura Capture to record narration over a PowerPoint slide you might consider using PowerPoints “Narration” feature (rather than Kaltura Capture). One advantage to using this technique is that if you decide to switch out a PowerPoint slide and change up the audio a bit you don’t have to redo the entire presentation. You just need to redo the slides you’ve changed. You can then export a video that can be uploaded into Kaltura, My Media. Another advantage is that this avoids the problem where the audio and video can fall out of sync (see above tip). Here are some resources on using PowerPoints Narration feature.
If you have a group that needs to share videos you can make a request for a new group from UW System. It makes it easy to share videos with a lot of other instructors. Group videos will show in My Media for each person in the group. Once you change the owner of a video to the group anyone in that group can edit that video, including; changing the owner and deleting it. So be sure the users in your group are responsible caretakers, some edits cannot be undone. I recommend using the embed code if you think a video is going to be added to more than 32 courses in its life span.
Kaltura just released a new automatic closed captioning tool. It’s machine captioning and coverts your audio to text. When finished your videos will appear with a CC button that users can select to read the captions. If you have used YouTubes closed captioning tool its similar. Select the video you want to caption, order the captions (don’t worry its free), wait, then edit for content, timing & spelling mistakes. This is great and allows us to more easily caption videos for accessibility needs.